


In this article, we will go through the minimum CSS knowledge you need to know before starting with Tailwind CSS. I assume that you already know the basics of HTML. But if you don't, I have written a blog series covering that here.
What Is CSS?
CSS stands for Cascading Style Sheets. CSS is not a programming language. CSS applies style to the HTML elements and changes the way they look on the screen.
CSS Syntax
Here is an example of a CSS syntax:
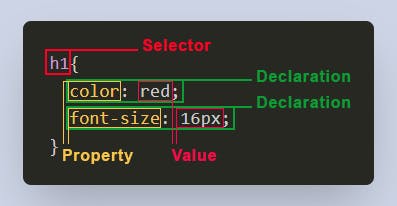
h1{
  color: red;
  font-size: 16px;
}
So let's break it down to understand it better. We have the h1 which is the selector. The selector points to the element we want to style, in this case, all the h1 elements . Each line within the curly braces {} contains a declaration (each declaration contains property: value;). The first declaration has the property color set to value red. The second declaration has the property font-size set to value 16px. The semicolon ; comes at the end of each of the declaration.
With the CSS code above, all the <h1> elements within the page will get the text color of red and the font size of 16 pixels.
How to Use CSS?
Let's create a folder called "website" in the desktop and open that with your text editor. Inside the folder, create a file called index.html.

Add the following code to the index.html page:
<!DOCTYPE html>
<html lang="en">
  <head>
    <meta charset="UTF-8">
    <meta name="viewport" content="width=device-width, initial-scale=1.0">
    <title>Zero CSS to Tailwind CSS</title>
  </head>
  <body>

  </body>
</html>
We can add CSS to our page in three ways:
Inline CSS
In this method we set the value of the style attribute on an element to the CSS declarations we want.
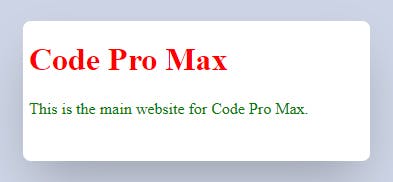
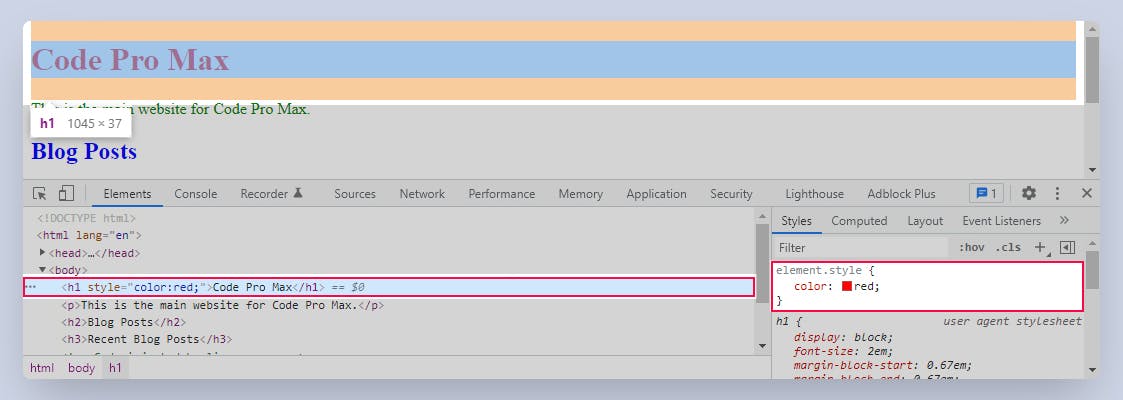
<h1 style="color:red;">Code Pro Max</h1>
Insert the above <h1> element inside the <body> of the page and check the result.

It is not recommended to use inline CSS because you need to specify all the styles needed for every single element and there is no reusability of your code.
Internal CSS
We can insert an internal CSS inside the head element of our page. We wrap the CSS code with a <style> tag. Let's add a paragraph to the page and apply a style to it using the internal CSS.
<!DOCTYPE html>
<html lang="en">
  <head>
    <meta charset="UTF-8">
    <meta name="viewport" content="width=device-width, initial-scale=1.0">
    <title>Zero CSS to Tailwind CSS</title>
    <style>
      p{
          color: green;
      }
    </style>
  </head>
  <body>
    <h1 style="color:red;">Code Pro Max</h1>
    <p>This is the main website for Code Pro Max.</p>
  </body>
</html>
You can see that the internal CSS syntax is a bit different and that is because the CSS declarations applied needs a selector to point to an element. The first part of the syntax (p) points to all <p> elements within the page. Then all the CSS declarations we have within the curly braces {} will get applied to the <p> elements.
The limitation of this method is that, you have to recreate the <style> section for every single page you have to reuse the styles on other pages.
External CSS
External CSS method is similar to the internal styles but with the difference of the styles are written in a separate .css file so that it is easier to reuse the styles on any page you need.
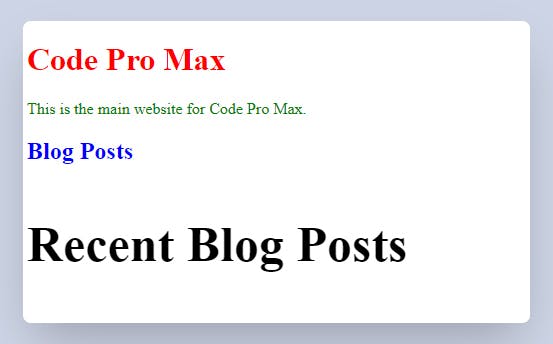
Add the following after the <p> element in our index.html file:
<h2>Blog Posts</h2>
<h3>Recent Blog Posts</h3>
Create a file called style.css and write the following code:
h2{
  color: blue;
}
h3{
  font-size: 50px;
}
The CSS style we have written sets all the <h2> tag's text color to blue and applies a font size of 50 pixels to all <h3> elements.
But how can we tell the html page about this external CSS file? We do that by adding a <link> element inside the <head> section of our HTML page.
<link rel="stylesheet" href="style.css">
The rel attribute specifies the relationship between the index.html file and the linked document (style.css) and we set it to stylesheet. The href attribute points to the location of the linked document.
Check the result and we can see that the external CSS file styles has been applied.
The good thing about external CSS method is that if we add another page and we want the same styles to be applied to our <h2> and <h3> tags, we only need to import the style.css file in that page.
Tailwind CSS uses an external CSS file that contains all the CSS classes we can apply to elements on our pages.
Chrome Developer Tools (DevTools)
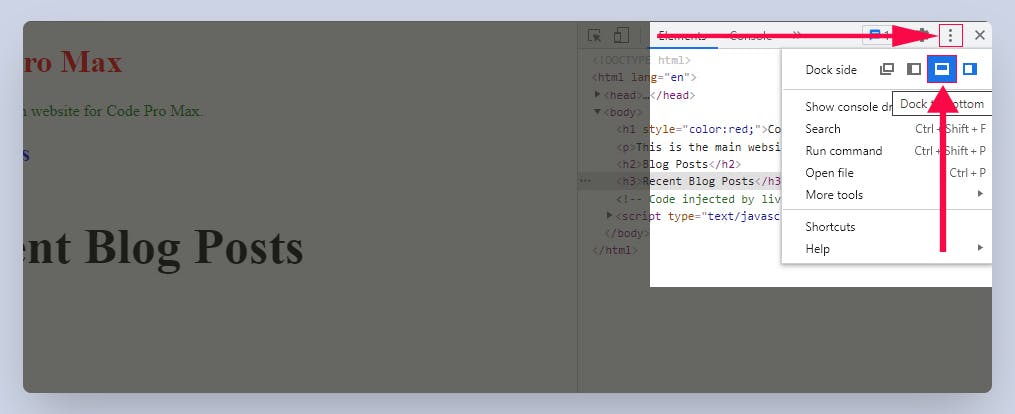
Let's use Chrome Developer Tools (DevTools) to inspect the styles applied to our page. We can use the Chrome DevTools to inspect the CSS applied to the elements on the page. Right click on the page and select Inspect. If it opens on the right side, click the "three dots icon" on the top right corner and change the "Dock side" to bottom.
Under the "Elements" tab, click on any element and that will show the styles applied to the element on the right side under the styles tab.
If you want to debug your page or something is not working as expected, Chrome DevTools will help you to find the issue faster.
CSS Selectors
So far we only covered one type of selector and that is selecting an element based on the element's tag name but we can use other ways as well.
Type Selector
We have used type selectors in our examples. We write the element's tag name as the selector. This example will change all the <h1> elements' font size to 40 pixels:
h1{
  font-size: 40px;
}
Save the file and check the result.
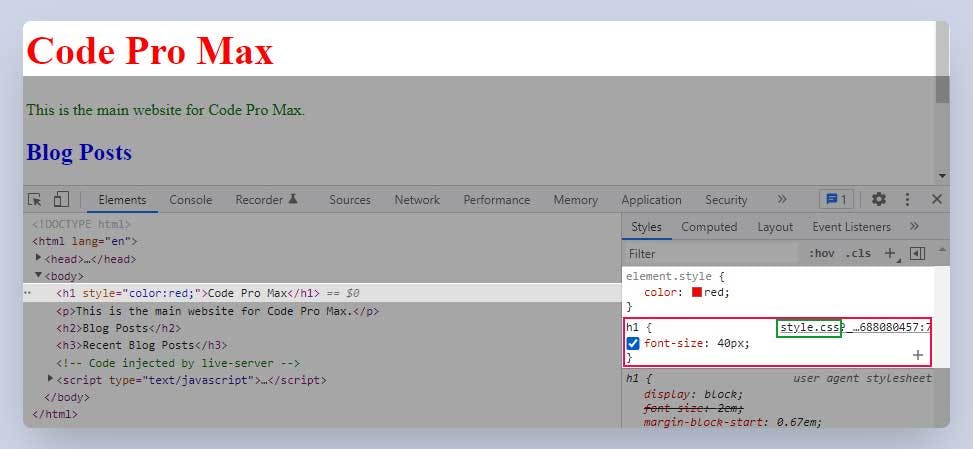
We notice from the Chrome DevTools that both the inline CSS and the external CSS styles has been applied to our <h1> tag. We can also see the file name style.css that the CSS is coming from. Chrome DevTools allows us to modify the styles applied and try different styles before we actually add it to our code.
Type selector is useful if we want to apply the same style to all the elements of one type. But let's say we have two <h1> elements and we want to set the font size of one of them to 40 pixels and the other one to 20 pixels.
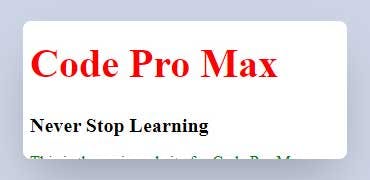
Add the following <h1> tag under the one we have now.
<h1>Never Stop Learning</h1>
Save the file and check the result.

You can see that the font size 40px got applied to both of the <h1> tags but we only want that for the first h1 and for the second h1 we want the font size to be 20px. We need another way to target a specific element and apply styles to it.
ID Selector
We can set a unique id attribute on an element and then apply CSS to it using the id selector. To make the browser know that this is an id selector and not a type selector, we prefix the id with a # sign. So first, let's add two different ids to our h1 elements.
<h1 id="mainHeading" style="color:red;">Code Pro Max</h1>
<h1 id="subHeading">Never Stop Learning</h1>
Now that each of the h1 elements has an id attribute, we can target the first one with setting the selector to #mainHeading and the second with setting the selector to #subHeading. I have removed the previous h1 selector since now we have an id selector for it.
#mainHeading{
  font-size: 40px;
}
#subHeading{
  font-size: 20px;
}
save the file and check the result.
You can see that each of the h1 elements got their own styles with the id selector.
The id selector solves the problem with the type selectors but what if we have a page with 5 different types of <p> tags and we want to show two of them in red, two of them in orange, and the other one in blue? If we want to use the id selector, we will repeat our self.
Inside the index.html file, after the h3 element, add the following paragraphs.
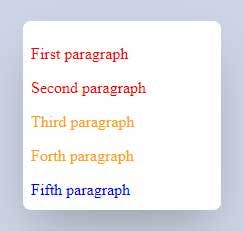
<p id="paragraph-red-1">First paragraph</p>
<p id="paragraph-red-2">Second paragraph</p>
<p id="paragraph-orange-1">Third paragraph</p>
<p id="paragraph-orange-2">Forth paragraph</p>
<p id="paragraph-blue">Fifth paragraph</p>
And for the CSS we will need to add the following to target each paragraph and set their color:
#paragraph-red-1{
  color: red;
}
#paragraph-red-2{
  color: red;
}
#paragraph-orange-1{
  color: orange;
}
#paragraph-orange-2{
  color: orange;
}
#paragraph-blue{
  color: blue;
}

We got it working but we have the same color: red; or color: orange applied multiple times. If we have 20 more paragraphs to show in red, we have to create 20 more styles in our CSS file to target them. The reason for repeating the same styles is that we cannot have the same id attribute for another element. The id attribute's value must be unique on each page. This is where the class selector can be helpful.
Class Selector
We use the class selectors if we have multiple elements that are using the same styles. In the last example, we had multiple paragraphs that use the same color. In order to use the class selector, we first need to add a class attribute to our element. I will first delete all the ids on the paragraphs and then add a class to them.
<p class="text-red">First paragraph</p>
<p class="text-red">Second paragraph</p>
<p class="text-orange">Third paragraph</p>
<p class="text-orange">Forth paragraph</p>
<p class="text-blue">Fifth paragraph</p>
The class attribute's value can be the same on multiple elements. In our CSS, delete the previous styles and add the following styles with the class selector. In order to tell the browser that we are targeting an element's class, we need to prefix the class name with a dot "." in our CSS file.
.text-red{
  color: red;
}
.text-orange{
  color: orange;
}
.text-blue{
  color: blue;
}
Save the file and check the result
The result is the same but now we have fewer line of CSS and we can add the classes text-red, text-orange, or text-blue to any other elements and change their text color. Another advantage of using class selectors is that we can add multiple classes to an element separated by a space and that will apply all of the styles to the element.
Let's add the following classes at the end of the style.css file:
.text-small{
  font-size: 20px
}
.text-medium{
  font-size: 40px
}
.text-large{
  font-size: 60px
}
Add the second class to any of the paragraphs separated by space to change the font size on them.
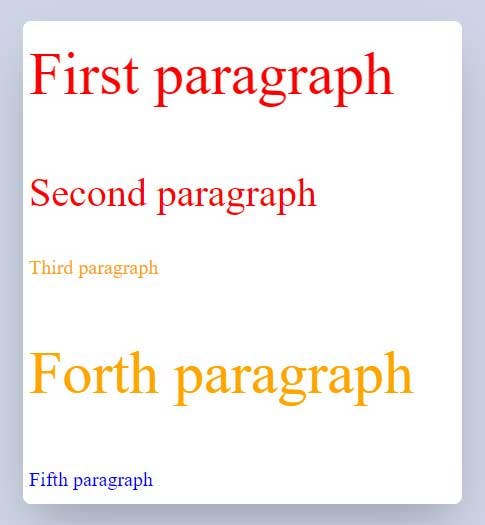
<p class="text-red text-large">First paragraph</p>
<p class="text-red text-medium">Second paragraph</p>
<p class="text-orange text-small">Third paragraph</p>
<p class="text-orange text-large">Forth paragraph</p>
<p class="text-blue text-small">Fifth paragraph</p>
And that will apply both styles to our paragraphs.
Tailwind CSS works with classes and we apply those classes to our elements using the class attribute.
There are other selectors that we can use but these were the important ones and for Tailwind CSS, most of the time we are using classes. You can check this link or this one for more information on CSS selectors.
CSS Comments
You can also add comments to your CSS. This is useful if you want to explain the CSS you have written. A comment will only be visible in your code and it will not display in the the browser or affect a page's layout. A CSS comment starts with /* and ends with */:
/* This text will not show in the browser or affect the layout of the page */

/* We can have
multiline
comments
*/

/*
CSS styles in the comments will not be applied
.text-very-large{
  font-size: 100px;
}
*/
CSS Properties List
In the examples we covered so far, we only had two basic CSS properties, color and font-size but there are a lot of properties we can use. You can head over to w3schools.com/cssref and check all of the CSS properties available with code examples. The reason I didn't cover those is that Tailwind CSS uses them in a different way. We use Tailwind CSS classes to apply styles to our elements.
What's next?
Now that you know how CSS works, you can move to installing Tailwind CSS and start learning about the CSS classes it provides.